I'm back again, and with another beauty how-to tutorial!
I learned from the experts how to put my hair up in a beautiful 1940s/1950s Sweetheart Roll, special thanks to Lady Lace and Candice De Ville (Super Kawaii Mama). So I wanted to share this lovely hairstyle with you all.
You will need:
U-shaped hairpins
Hairgrips (Flat, if possible)
One hairband
Corsage/decorative slide/headscarf (See Rosie The Riverter post)
Firm hold hairspray
Step One:
Part your hair down the middle, and, starting with the right hand side, take a section about a palm-width into the air. Wind the ends downwards, going back on the hair, around two fingers, then remove your fingers and continue to wind down.
Step Two:
Once you've created a tube-shaped roll that meets the top of the head, hold in place and secure with about two flat hairgrips through the centre of the roll. Fix with plenty of hairspray, and lightly pin down any stray sections of hair. Repeat with the left hand side, making sure that both the rolls "meet" in the middle, and are as even as possible. Fix with lots of hairspray, to ensure that this stays as neat as possible
Step Three:
Brush out the rest of the hair as thoroughly as possible, but take care not to tug at the rolls. Now, this step requires you to be a little dextrous, but don't worry too much, it's still fairly simple. Gather the hair into a low ponytail, and secure reasonably tightly with the hairband, however, leave some slack.
Step Four:
Reaching above the hairband, gently pull the hair above the hairband apart, creating a small hole. Twist the ponytail a couple of times, and then gently feed through the hole around three or four times until no hair remains dangling down. Secure with both grips and U-shaped pins. You may need quite a few of these, as this is the only support this part of the roll will have. As before, fix with plenty of hairspray.
Step Five:
Now, this is the fun part - the decoration! If you are using a corsage, gently push it into your hair just above your ear, so it lightly sits in line with your eye. If you are using a decorative slide, gently push it down into the top of the bottom roll, taking care not to dislodge it. If you are using a headscarf, roll the scarf into a sausage shape, and gently tie at one side of the head in a small, neat bow. Use hairgrips to secure any loose sections, and this will help to keep the scarf in place.
And there you go! A simple, beautiful hairstyle that takes virtually no time! It's so versatile, all you have to do is vary the decoration to fit the event.
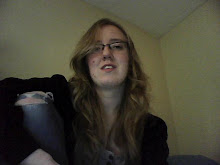
 |
| You can't really see the corsage here, but this photo demonstrates how flattering the hairstyle can be |
 |
| Better view of the corsage (: |


